Saturday, August 30, 2008
1 Year my Blog - Happy Birthday!!-
1 year is a long journey for my blog, at first i wrote it in Indonesian language, but then i started to use English language as i lean, so i can share the recipe for my Aussie friend too.
I started blogging on the beginning of August last year ( a bit late to celebrate i knew..), but at least i didn't forget completely :) and i made Japanese cheesecake on the cup, i gave away some of the cake to my friends and neighbors, i made about 12 cupcakes and 1 oval cheesecake and I'm sure that we couldn't finish them all.
Japanese cheese cake always tempt me, 1 can eat 3 cups at a time :) .
I put some red maraschino cherry with cheese cream or with cream and mint leave for the topping and some with sliced purple grapes.
Ellyn got one without cream topping but grapes, she love it too! the texture is very moist, almost like cotton ( they also called it cotton cheesecake), i got the recipe from my friend in Indonesia, the baking time is about 1 hour and using water bath technic (au bain marie).
If any of you interested to order, just let me know okay?? this cake is highly addictive for cheesecake lover like me! size is available on oval, round 20cm and individually on the cup, topping is variable ( strawberry, mandarin, grapes, kiwi or as seasonal fruits as you desire).
Labels:
Cake Decorations,
Cake promotion,
Cheesecakes; bake,
event
Thursday, August 28, 2008
Masak bareng -Nasi Tim Ayam Jamur // Steamed rice with chicken and mushroom topping-
I suppose, i will write this in Indonesian language since this Event for Indonesian :) host by Deetha, Shinta, Lidia and Ayin.
Karena baru pertama bikin nasi tim ayam,dan keburu-buru bikinnya, jadi ngak baca resep dengan seksama alhasil, semua kaldu di campur sama tumisan ayam deh, hihi... kelihatannya jadi kayak nasi goreng gitu ya?? lain kali deh bikin lagi sesuai resep.
Trus beras yang aku pake iti long grain rice, kayaknya menyerap air lebih banyak dari biasa, padahal aku udah guyur pake kaldu sampe berasnya tenggelam semua loh... ya sut lah itung2 pelajaran buat kedepannya kalo bikin nasi tim lagi. Tapi masaknya lumayan lama ya 1 jam, Ellyn ngak sabaran nunggu, haha.. kalo di rice cookerkan paling 15 menit, mateng deh nasinya..
1 hal lagi yang bikin aku ngak sabar buat posting gambar ini. karena baru pertama coba teknik settingan untuk outdoor picture dengan makanan, hasilnya lumayan juga aku puas, abis bosen di dalam terus, apalagi sebentar lagi summer jadi pasti banyak aktivitas yang asyik di luar.
Aku ambil resepnya (di modif) dari buku Variasi nasi tim - sajian lezat lengkap gizi- by Lilly T Erwin, resep aslinnya menggunakan daging giling (Nasi tim daging), tapi ku fikir kayaknya cocok juga di ganti ayam sama jamur, jadinya ngak susah2 cari resep deh. ini dia resepnya:
Nasi Tim Ayam Jamur // Steamed rice with chicken and mushroom topping
- 300 gr Beras
- 250 gr ayam fillet, potong kecil dadu
- 100 gr jamur Champignon ( iris tipis)
- 1.500 ml air kaldu ayam
- 2 sdm minyak goreng
- Wortel, brokoli, cauliflower dan zukini rebus (pendamping)
- 4 siung bawang merah, iris tipis
- 1/2 bawang bombay, iris kecil
- 2 bawang putih, iris tipis
- 1 sdm kecap manis
- 1 sdm kecap inggris
- 1 sdm kecap asin
- 1 sdt garam
- 1 sdt lada hitam
- Cuci bersih beras dan tiriskan.
- Tumis bumbu iris sengan menggunakan minyak goreng hingga harum.
- Masukkan ayam, tumis hingga setengah matang, lalu masukkan jamur dan bumbu-bumbu lainnya. Beri 1 sdm air agar bumbu meresap sempurna.
- Siapkan 5 buah mangkuk tim, bagi adonan menjadi 5 bagian, bagi rata ke dalam masing-masing mangkuk, tutup atasnya dengan beras lalu tuangkan kaldu hingga beras terendam. Kukus kurang lebih selama1 jam, angkat.
- Sajikan dengan sayuran rebus, Yummy!! Ellyn syuka sekali...
Wednesday, August 27, 2008
Award
I got this award from my friend Deetha, don't know why she chosen me with this award, am i creative?? yeah maybe or sometimes :) anyway thanks Det for the award, i will forwarded to another creative blogger too as mentioned on the rules.
This award reminds me that i must be more creative in the future... by the way its started spring here, everything looks so beautiful... and the good news is that i become more understand about outdoor photography too, yeah... so spring is a good time to start taking picture outside and explore beauty of nature, am i right?. Thank God i finally know how to set my camera for outdoor with the crisp colours in the right time :) to see my picture creation click here on my flickr gallery.
I must forward this reward to 5 of my friends, and the lucky blogger are:
1. Mamapindi
2. Mariena
3. Rea
4. Bunda Yuli
5. Mama Kintan
So here is the rules to for the award:
1. The winner may put the logo on her/his blog
2. Put a link to the person you got the award from.
3. Nominate 5 blogs.
4. Put links to the blogs.
5. Leave a message for your nominees.award
Monday, August 25, 2008
Fondant Dolly & flowers
I started to get addicted making fondant figurine, and I'm waiting for the next term to attend decorating class, on one of the cake shop in Melbourne, Yippee... i already falling in love with fondant now, LOL.
I think it wasn't bad for my first attempt, am i right?. next time would be better for sure, especially if i have more time (not in a rush), those 2 dollies wasn't smooth yet, the fairy dolly looking a bit strange on her face, hihi.. i named them Jessy and Lily the fairy.
I will started to think about what i wanna make for Ellyn's 2nd birthday from now, i was thinking of the castle cake. By the way happy Monday!!
Tuesday, August 19, 2008
Orange,Bread and butter pudding
I submit picture for Click event, hosted by Bee and Jai, this month theme is citrus, i remembered that i made some pudding with orange and i love the picture. i posted the recipe here on June.
I usually put copyright on my picture, but i suppose i don't need to do that for this event ( well, no one does), not expecting much to win but it will be nice too if that's happen ^_^.
Cheers.
Tumis kailan cah cumi // Chinese brocolly with squid stir-fry
In my country they called this vegetable "kailan", do not know why they name it Chinese broccoli here, seems like many things came from China and name it after their country, anyway i love this new recipe, and the vibrant colour too... Basically i love all kind of veggies, only since I'm a teenager :) .
Try with chicken or shrimp next time, will be a s delicious as this one. Only problem i found with the squid is that i never clean or handle that thing before! so i just use my feeling how to clean and cut them, i also confused what is the different between calamari and squid, any idea?.
Tumis kailan cah cumi // Chinese broccoli with squid stir-fry
Ingredients:
Method:
- 1 medium (100g) cleaned squid hoods
- 200 Chinese broccoli ( kailan )
- 1 red capsicum (paprika)
- 2 tablespoon oil
- 2 clove garlic, crushed
- 1/2 onion, chopped
- 3 tablespoon teriyaki sauce
- 50 ml water
- salt and pepper to season
- Using a sharp knife score inside in a criss-cross pattern. Cut in half length ways. Cut each strip cross ways into 4 pieces. Pat dry with paper towel.
- Heat oil in a wok or saucepan over medium-high heat, cook garlic and onion until fragrant, add squid, cook for 3 minutes.
- Add water and teriyaki sauce, simmer until boil, add Chinese broccoli, capsicum and season with salt and pepper.
- Serve.
Labels:
Indonesian food,
Seafood,
side dish,
vegetables
Monday, August 18, 2008
Banana & Sultana - stuffed Toast
Sometimes i feel soooo... lazy to work in front of my computer, to update my blog. I actually took many pictures of my food, but they're still sitting nicely on my camera, waiting for me to transfer to the computer, so i had plenty of recipe to upload, as long as the recipe in English, i can do it quick, but if they still in Indonesian language, i need to force my self, argghhh...
This is healthy yet yummy breakfast for me and my daughter, i hate the original toast for brekkie, so i had some breakfast recipe collection, for when i feel bored with my oatmeal or cereals. Recipe from Recipes+ magazine
Banana & Sultana - stuffed Toast
- 2 eggs
- 1 cup milk
- 2 large ripe bananas, mashed
- 1/3 cup sultanas, finely chopped
- 8 slices white or multi grain sandwich bread
- 60 gr butter
- Whisk eggs with milk in a large shallow bowl. Combine banana and sultanas in a separate bowl. Let stand for 5 minutes. Divide banana mixture equally among 4 bread slices and spread evenly. Top with remaining bread slices.
- For each sandwich, melt 1/4 of the butter in a large non- stick frying pan over moderate heat until foaming. Place sandwich in egg mixture; stand for 30 seconds. Turn over and soak for 30 seconds more. Drain off excess liquid and place in pan. Cook for 1- 2 minutes each side or until golden. Cut sandwiches in quarters to serve.
Tuesday, August 12, 2008
Saturday, August 9, 2008
Carrot cake with cream cheese frosting
I wonder why i never really interested to make carrot cake, until i made some figurine carrot, pumpkin and some bananas from left over fondant. After those time i spent to make the miniature carrot, then i got an idea to make a real carrot take with carrot topper i made, when i finally tried the cake, surprise.. surprise.. now i addicted to this cake!!, its so yummy... Selamat weekend semuanya! here is the recipe from Fresh Living - August 2004 , Page 53.
Carrot cake with cream cheese frosting
Ingredients (serves 12)
- Olive oil, to grease
- 2 (about 300g) carrots
- 1 cup (150g) self-raising flour
- 1/2 cup (75g) plain flour
- 1 tsp bicarbonate of soda
- 1/2 tsp ground cinnamon
- 1/2 cup (80g) brown sugar
- 3/4 cup (185ml) oil
- 1/2 cup (125ml) golden syrup
- 3 eggs
- 1 tsp vanilla essence
-
Icing
- 250g spreadable cream cheese
- 1/2 cup (80g) icing sugar
- 1/2 tsp vanilla essence
Method:
- Preheat oven to 170°C. Grease a 20cm (base) round cake pan lightly with oil, and line with non-stick baking paper. Peel and grate the carrots, and set aside. Sift the flours, bicarbonate of soda and cinnamon into a large bowl.
- Put the brown sugar, oil, golden syrup, eggs and vanilla in a separate bowl. Use a balloon whisk to mix until combined.
- Pour the oil mixture into the dry ingredients. Use a wooden spoon to stir gently until just combined. Stir in the grated carrot.
- Pour the mixture into the pan and bake for 1 hour. Set aside for 5 minutes, before turning out onto a wire rack to cool completely.
- To make the icing, place the cream cheese, icing sugar and vanilla in a bowl. Use a wooden spoon to mix until well combined.
- Spread the icing over the cake.
Friday, August 8, 2008
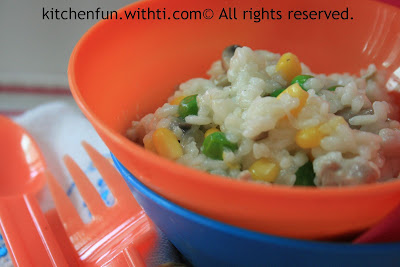
Peas, Mushroom and Corn Risotto
One of Ellyn's favorite food.
Peas, Mushroom and Corn Risotto
Ingredients:
- 2 tablespoons olive oil
- 1 brown onion, finely chopped
- 2 garlic cloves, thinly sliced
- 2 cups arborio rice
- 5 cups chicken stock
- 1 1/2 cups frozen peas
- 1 small corn kernels
- 50 gr Mushroom, chopped
Method:
- Heat oil in a large, heavy-based saucepan over medium heat. Add onion and garlic. Cook, stirring often, for 5 minutes or until soft, add mushroom. Add rice. Cook, stirring, for 1 minute.
- Meanwhile, pour stock into a saucepan. Cover and bring to the boil over high heat. Reduce heat to low and keep at a simmer.
- Keeping rice mixture at a constant simmer, add simmering stock, 1 ladleful at a time. Stir with a wooden spoon until all liquid has been absorbed. Repeat with remaining stock, adding peas and corn with the last ladleful. Remove from heat. Add salt and pepper. Stir to combine (rice should be tender but firm in the centre and risotto should be creamy in texture). Spoon into bowls and serve.
Thursday, August 7, 2008
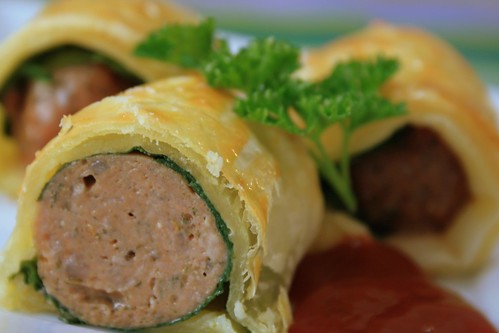
Spinach and sausage rolls
The original recipe is sausage rolls, but i wanna make it a bit more healthier with some vegetables on it, so i add some baby spinach, besides it makes the food looks more colourful and pretty.
This is lazy but yummy recipe for me, because i used thawed frozen pastry,only need less than half an hour to prepare and cook them, so if you being lazy to cook tonight, why not try this recipe? :) Kids will love it too.
I usually cook the sausage on the BBQ, but i don't like to eat burnt stuff on the skin, they're a bit bitter and ugly colour , another alternative is on the grill or the oven, but if i cooked them too long the skins will be shrunk and tough, so its tricky handling the sausage by it self for me. With the pastry around the sausage makes it on their original shape and cook evenly.
Spinach and sausage rolls
Ingredients:
- 1 tablespoon olive oil
- 100 gr baby spinach, washed
- 2 sheets frozen ready-rolled puff pastry, partially thawed
- 1 egg, lightly beaten
- 8 thick beef / lamb sausages
- tomato chutney and salad greens, to serve
Method
- Preheat oven to 200°C. Line a baking tray with baking paper.
- Cut each pastry sheet into 4 squares. Place 1 square on workbench. Brush 1 edge with egg. lay some spinach over pastry. Top with 1 sausage. Roll up pastry to enclose sausage, with egg-brushed edge on top. Press to secure. Place, seam side down, on tray. Repeat with remaining pastry, egg, spinach and sausages. Brush tops with egg.
- Bake for 20 to 25 minutes or until sausages are cooked through and pastry is golden. Serve with chutney and salad.
Tuesday, August 5, 2008
Red & White Foodie Photo Contest // Elmo celebrating Indonesian Independence day!
I made this cake decorating today, for the Red & White Foodie Photo Contest, host by Dhi-Dwi and Fitri, I'm hoping to win (well of course, everybody does), but this cake also special for celebrating Indonesian Independence day, which is on August 17.
As Indonesian, we usually celebrate this moment every year with so many different games, each game has a meaning , everybody can feel the spirit of celebration on that day, here we usually celebrate here at Consulate General of Republic Indonesia (KJRI) .
This cake idea started when i saw my daughter's Elmo's book, and as i mention on my previous posting that i will practicing the frozen butter cream transfer, so i add some writing on the side of the cake as an addition to enter the contest.I'm quite happy with the result as beginners, not perfect i know, need more practice, best of all its so fun making this. Does anyone want me to make one for you?? :)
Look... Elmo holding Indonesian flag!! ^_^ and he bring some love too!!. Happy 63th Independence day my Indonesia! Go go go... Merdeka!
Monday, August 4, 2008
Putu Ayu
This recipe taken from Dapur bunda, Thanks for the recipe Bunda, btw I didn't have a chance to know her better because she has passed away, i created my blog a few months after that, she must be really a good Chef, i love all her cooking and baking recipe.
This is another steam cake with no butter, but coconut milk and shredded coconut, quite easy and quick to make, but no doubt about the taste, its yummy.
I can eat 3 at a time :) , even Ellyn eat 2!! she love this cake too, but my hubby not really crazy about this cake. Next time i will add more pandan pasta for brighter colour, mine looks pale, not like the original recipe of Dapur bunda. Here is what you need...
Putu Ayu
ingredients:
- 2 eggs
- 75 gr caster sugar
- 1 tablespoon emulsifier
- 125 gr plain flour
- 100 cc coconut milk, boil, cooled
- 1 teaspoon salt
- 1 teaspoon vanilla
- shredded coconut
- 1 teaspoon pandan paste
- Heat the big steamer.
- Beat the eggs, sugar, salt vanilla and emulsifier on a medium bowl.
- Add flour, whisk it gently with spatula or wooden spoon.
- Pour in the coconut milk little bit at a time, and whisk it until smooth, last add the pandan paste.
- Put and press the shredded coconut on a greased plastic jelly mould, until flat.
- Pour the batter about half of the mould capacity.
- Steam for 10-15 minutes.
- Serve warm or at room temperature with a cup of tea.
Saturday, August 2, 2008
My Flower fondant cake
After being so lazy practicing cake decorating, yesterday i push my self to do it, no need to get any material from the shops, i already have all i need, including dummy cake made from Styrofoam ( Not edible, only for display), means i don't have to bake any real cake for this project.
I only try to used fondant once before this, using home made fondant, this time i got ready to use fondant, so pliable, smooth and not sticky on my hand ( so easy to handle). And i got the idea from flickr friends, she's really talented artist, she allow me to copy her idea (but i didn't exactly copy the whole thing), and i just made it using my intuition, because i never did any decorating class.
First i made the flower using flower cutters and small circle, after that brush the Styrofoam with apricot jam, then covered with the fondant, then make the rope for the border, last i attach all the flowers and the dots with apricot jam too. I almost forgot one thing : i use 4 wires with the flower on top for decoration on the cake, to make it looks pretty ^_^. Not much difficulties i found this time, apart from rolling the fondant, need a strong hand.
My next project will be a barbie doll cake, frozen butter cream transfer, and figurine doll. Enjoy and have a nice weekend :)
Subscribe to:
Posts (Atom)