Friday, December 24, 2010

Southern Red Velvet Cake with Cream Cheese frosting

IMG_1413

red-velvet

To be honest this is my red velvet cake ever. I heard about this cake for a while from Cake show on TV and promise to my self that I would try making it for special occasion. But somehow I haven't got any guts until one day I saw one of  friend FB status mention about this cake and it's near my birthday..then... aha.. I got the idea to make this cake for my self a day before my birthday  hahaha... *wicked laugh* ( because I wasn't really plan to invite any friends over).

I never seen any cake recipe using heaps of vegetable oil before. So I wasn't sure and cannot imagine what the taste would be like. When I started preparing the ingredients I just realized that I didn't read the recipe carefully (bad habit Ti!) that I didn't buy any butter milk! So I have to make butter milk substitute from a cup of milk mix with 1 table spoon of squeezed lemon.

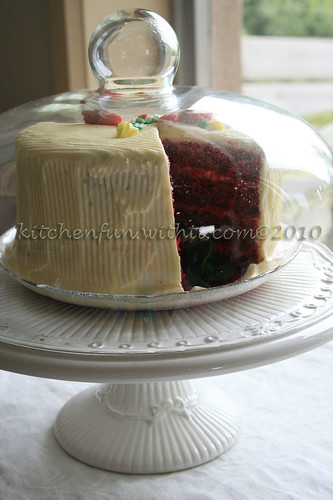
Anyway... when I measured the flour I also have to admit my self that I am sooo.. not careful to check my pantry. I thought my existing flour would be enough for the recipe but once more bummer.. I'm wrong!! I only got about 1 cup of it.  So I came up with the idea *ting* Because I have self rising flour sitting there in the pantry as well I used this for the the remaining 1 1/2 cup that  need and put less (only 1/4 tsp baking soda). And bake it on the 2 small tin for about 1 1/2 hours.
Guess what?? it's all works.. Yippeee...
IMG_1408
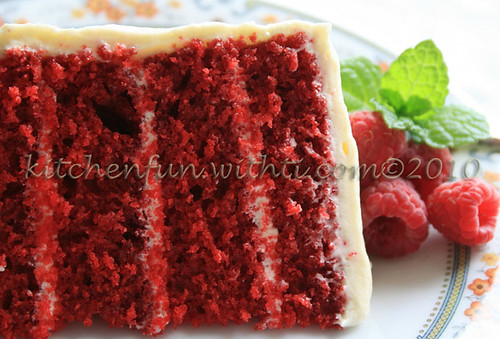
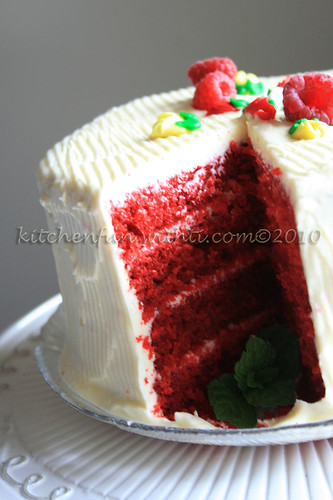
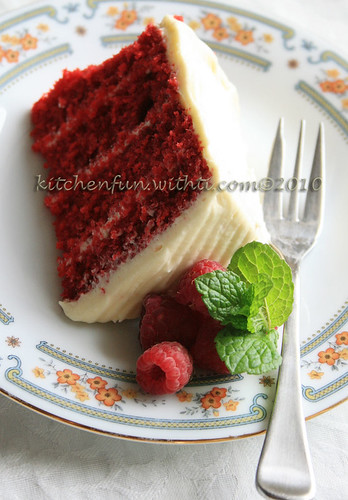
To be honest I really happy to see how the cake was turned up. So vibrant Red and looks delicious!

The best part of making birthday cake was to decorate it but I don't want any fancy decorations of course!.
(I only used half  recipe of the cream cheese frosting ) With my daughter watching the whole process I could see her face that she really want to try the cake :) poor girl she have to wait until we cut it on the next day.

By the way I just wanted to say Merry Christmas & Happy New year 2011 ... Have a great time!

If you want the recipe please email me at kitchenfunDOTwithtiATgmalDOTcom.

IMG_1411
IMG_1416


Monday, December 20, 2010

Bolu kukus pelangi (Bolu kukus ketawa)// Mini steamed rainbow cake

bolkus3
Uggghh.. I finally updated my blog again after a while. Been meaning to do that but always have many things to do. It’s weird weather going on here in Melbourne. It’s already December and summer supposedly here but what happen is very wet and cold days :(. Well I know we needed rain here.
 I guess I just have to be patient until the weather get warmer so I can plan something to do outdoor with my daughter this school holiday.  Can hardly wait..!!.

Anyhow... about this mini cake. I made it many times in the past and it’s one of my signature Indonesian dessert to bring  If I invited by friends to their place or party as well as at my place. It’s quit light and moist. Believe it or not there is no butter or margarine needed for this recipe so no need to feel guilty eating more than 2 :). Because of the shape of the cake (rising and crack in the middle) we often call them laughing cake. So If the cake isn’t laughing means failed. I made similar rainbow cake here (no laughing type/ version) and another laughing steam cake with different flavor here.

Many of you probably wondering what Ovalett/ TBM  is. Ovalett (or Ovalette) is a cake stabiliser/emulsifier used predominantly in the baking of sponge cakes or steam cakes. It gives the cakes a super fine texture. It is used to aid the beating process of egg yolks or egg whites to ensure its stiffness holds. It helps the eggs to rise rapidly and stiffly and also to remain stable therefore ensuring that eggs do not lose their voluminous texture. Ovalett ensures quick whipping properties and provides a remarkably stable batter that may be left unbaked for some hours. Ovalett produces a perfect sponge that is not too fragile, while providing excellent flavour and fresh keeping qualities.(source = Ovalett.com).

bolkus
With the mould in the background

Many Indonesian cake / snack using this emulsifier. Nowadays You can find it quite easy  in Indonesian supermarket here in Melbourne. As well as the special mould for this particular steam cake. So don’t be afraid to try and make this cake ok?.  And email me if you have any questions.
One more tips from me is that you have to wrap the steamer’s lid with the cloth so that the hot water droplets from the steam is not dripping to the cake that can cause the cake wet and not” laughing”.

bolkus2


Bolu kukus pelangi (Bolu kukus ketawa)// Mini steamed rainbow cake

Ingredients:

* 2 eggs
* 200 g caster sugar
* 2 tsp TBM/ Ovalett/ SP (emulsfier)
* 275 g plain flour
* pinch of salt
* 200 ml soda water (lemonade)
* Pandan paste, strawberry flavored paste ( or using food colouring is fine)

Method:
  1. In a large bowl, beat eggs, sugar, eand mulsifier  with electric beater,  until white and fluffy.
  2. Mix the flour & salt, into the eggs mixture little bit at a time,whisk it gently.
  3. Pour in the soda water, whisk again.
  4. Divide the batter among 3 bowl, add the pink colour and green colour each bowl and leave the rest without any colour.
  5. Preheat the steamer, cover the lid with a towel/ cloth.
  6. Put the cupcake paper on the mould. ( I used cut baking paper)
  7. Spoon pink, green and white on the covered mould, steam for 10- 15 minute.
Btw I also bring this cake to my daughter Kinder party with mostly Australian Mums and they amazed how beautiful (and tasty too!) this cake is :). They can't imagine how did i do it cos they never seen any cake like this before and looks unusual for the cake isn't it?? . ahh... so proud of my Indonesian food!.
Happy Holiday Everyone!!

Tuesday, November 16, 2010

Es Pisang Ijo // Green wrapped banana on Ice

es-pisang-ijo
I remember exactly when was the last time I made this dessert. Back in 2001 at my kitchen school with my classroom mate "Theresia". We were always in the same group for our cooking class and mostly cook traditional Indonesian food apart from another pastry class that we learnt about various pastries from around the world  and cake decorating.This dessert however very refreshing for tropical country like Indonesia or summer in western country. For mostly Indonesian food or dessert the more effort your doing the more better it taste.

It has been confusing weather here in Melbourne with some heavy rain and cold or very sunny hot days sometimes. I was planned to make this dessert last week because I thought it will be as hot as the past week and I was wrong. Because I already bought all the ingredients I needed  I just carried on making it yesterday when the weather is cold :(

I have to hiding it from my daughter because somehow she got cough and runny nose again. I knew she would love this dessert as much as I do.Well maybe next time baby :)

I only make half of the recipe and Got the recipe from Indonesian online magazine called Femina

pisang-ijo

Es Pisang Ijo


Bahan // Ingredients:


* 175 g tepung beras, ayak // 175g Rice flour, shifted
* 1/2 sdt garam // 1/2 tsp salt
* 300 ml air // 300 ml water
* 100 ml air daun suji // Omit
* 1/2 tetes pewarna hijau // 1/2 stp pandan paste (green colouring)
* 50 g tepung sagu // 50g g arrowroot flour
* 6 buah pisang raja matang // 6 lady finger banana

Bubur: // for the porridge Ingredients:

* 800 ml santan dari 1 butir kelapa parut // 800ml coconut milk
* 50 g tepung beras // 50g rice flour
* 75 g gula pasir // 75g caster sugar
* 1 lembar daun pandan, simpulkan // 1 pandan leave, make a knot
* 1/4 sdt garam // 1/4 sdt salt

Pelengkap: // Condiment

* Es Serut // Ice
* 100 ml sirop cocopandan, siap pakai //100 ml red cocopandan syrup ~ i use rose syrup
* 100 ml susu kental manis // 100 ml sweetened condensed milk

Cara membuat: // Method:

  • Campurkan tepung beras, garam, air, air daun suji, dan pewarna hijau, aduk rata. Jerang di atas api kecil hingga mendidih sambil aduk-aduk agar adonan tidak berbutir. Angkat. // Mix together rice flour, salt, water and green colouring, mix well . Simmer and whisk it until thicken, set aside to cool.
  • Masukkan tepung sagu sedikit demi sedikit sambil aduk-aduk hingga kalis. Bagi adonan menjadi 6 bagian. Bulatkan dan tipiskan hingga 1/2 cm. // Then add arrowroot flour and knead until smooth (dough), devide into 6 dough, roll about 1/2 cm thick.
  • Balut setiap pisang dengan adonan tepung beras hingga semua bagian tertutup rata.// Wrap each banana.
  • Rebus pisang dalam air mendidih hingga mengapung dan adonan matang. Angkat. Tiriskan. Sisihkan. // Boil wrapped banana until floating, drain and set aside, meanwhile make the porridge.
  • Bubur: Campurkan santan, tepung beras, gula pasir, daun pandan dan garam, aduk rata. Jerang di atas api sedang sambil aduk-aduk hingga kental. Angkat. // for the porridge : Mix coconut milk, rice flour, pandan leave and salt, simmer until thicken, set aside to cool.
  • Penyajian: Potong-potong pisang ijo. Letakkan di atas piring saji. Tuangkan bubur. Tambahkan es serut, sirop, dan susu kental manis.// Last step to serve (on the big bowl or plate)  is cut the banana, add porridge, ice and drizzle with syrup and sweetened condense milk.
  • Yummy!
Untuk 6 porsi // To serve 6

Wednesday, November 10, 2010

Wingko Babat

wingko-babat-1

Have you heard about the Deadly eruption on Merapi Volcano in Indonesia? It is my country.
So sad to hear the news especially my grandparents live there too in Central Java not too close from the volcano but still got lots of ashes from there :(

You can have a look the picture gallery
here

Anyway, I'm not sure what should i name it in English for this snack. And I don't know who is the first person who invented this recipe I just google it and there are a lot of this recipe on the web. But this snack have been around for centuries in my country.

babat-wingko


Wingko babat

*150 g ketan putih // 150 g glutinous flour
* 300 gram kelapa parut kasar // 300 g shredded coconut
* 1/8 sendok teh vanilli bubuk // pinch of ground vanilla
* 1/4 sendok teh garam // pinch of salt
* 200 gram gula pasir // 200 g caster sugar
* 1 butir telur // 1 egg
* 150 gram santan kental instan // 150 g coconut milk

Cara membuat // Method:
  1. Campur tepung ketan putih, kelapa parut kasar, vanili bubuk, dan gula pasir. remas-remas sampai gula larut. // Mix the flour, sugar, salt, vanilla.
  2. Tambahkan telur. Aduk rata. Tuang santan sedikit-sedikit sambil diuleni rata. Aduk rata. // Add the egg and pour in coconut milk little at the time and mix it with hand.
  3. Pipihkan adonan. bentuk kotak.// Make a flat square.
  4. Panaskan wajan datar yang dioles tipis dengan minyak (saya tidak pakai). panggang wingko sampai matang sambil dibolak balik. Potong- potong kotak sesuai selera. Sajikan. // heat non stick pan and add a drop of oil (optional), grill wingko babat until brown each side and cooked trough. Cut into small square. Serve

Saturday, October 9, 2010

Special offer for Kitchenfun readers in Australia.


Hello. I'm back with something special for 
mykitchenfun readers in Australia!

Here's a great deal for those of you who love fine food but don't always feel like going out. You can get a great meal delivered to your door from a range of fine restaurants to enjoy at home. Great for that intimate dinner that you would otherwise have to prepare yourself.
Order online and get instant confirmation.
Hundreds of restaurants around Australia, 200 specials, no markup
Use this special code 3C25AF and get $10 off your first order.

Please note: Discount only applies to your first order.

Available at participating restaurants (which display the "accepts vouchers" sign)
Expires Dec. 31,2011, min order $20

Happy Weekend everyone!!

Sunday, September 19, 2010

Indonesian Steamed brownies

<span class=browkus" width="333" height="500">

Some peoples must be wondering, what is the steamed brownies? how is it taste like?. And I bet when you see these pictures you think this is just a chocolate cake.

It is brownies, but steamed! . Well for Indonesian this unique cake is not unusual, there is very famous bakery shop in Bandung west Java selling the most delicious steamed brownies.

This brownies is not like any common brownies (well of course, because it is steamed and layered :P). I mean yes it looks like layered chocolate cake rather than brownies, as well as the moisture of the brownies and the sweetness. Because we use caster sugar plus sweetened condensed milk for the middle layer. But still we don't call it chocolate cake :).

Lucky me. I still have my huge steamer so I could fit my rectangular tin special for this brownies (import from Indonesia). I got the recipe from NCC written by Mrs. Liem.
Unfortunately, I didn't make enough batter of the middle part :( Anyway there is no doubt with the taste though...

Warning: Highly addictive & High in Cholesterol


brownies-<span class=kukus" width="500" height="333">

Ny.Liem Steamed Brownies

Ingredients:

* 6 eggs
* 225 gr caster sugar
* a pinch of Vanilla powder
* a pinch of salt
* 1 / 2 tsp emulsifier
* 125 g Flour (lsifted with cocoa powder)
* 50 gr cocoa powder
* 175 ml vegetable oil
* 100 g Dark Cooking Chocolate (melted and mixed with oil)
*75 ml sweetened condensed milk

Method:

1. Heat a steamer. Greased the tin with oil.
2. Beat eggs and sugar until half fluffy , and add the emulsifier. Beat again until fluffy.
3. Add the flour and cocoa powder mixture gradually, stirring until smooth .
4. Add a mixture of oil and DCC, stirring until smooth , set aside.
5. Divided into 3 batter in the bowl . Add sweetened condensed milk to the batter no 2 and mix well .
6.Pour the 1st batter the first batter to the tin and steam for 10 minutes, then pour in the 2nd batter and steam for another 10 minutes, then add the last batter and steam for 20 minutes or until cooked.

I usually eat them with sprinkled cheddar cheese :)

hints:
Make sure to heat the steamer and dont open the lid before 10 minutes each time
Also it's a good idea to wrap the lid with towel so the the steam is not dripping to the tin.

Tuesday, July 20, 2010

Laksa (Johor style)

laksa-penang2

I believe this is Malaysian dish as Johor is the third largest states in Peninsular Malaysia. got the recipe from my Indonesian magazine without saying where the recipe originally come from and I'm not really familiar with Malaysian dish.

Anyhow.. you can always substitute salmon with any fillet fish you like and adjust the chili amount. My suggestion is to use fresh chili or mixed between dry and fresh ones.
What a perfect dish for cold winter like this, warm up your body straight away from the hot and spicy combinations. However If you don't like chili at all i guess the taste will still be good. So don't be afraid to try :)

Delicious dish always need more effort to make but they are worthed. My trick is to always make more paste and freeze some of them, especially if you only cook for one or two peoples . So next time You feel like this dish again it will be ready in minutes :)

IMG_0248

Here is the recipe originally called Laksa ala Johor (Seni Memasak Kartini- Hidangan Mi yang menggoda selera)

Laksa (Johor style) - Serve 4

Ingredients:

* 250 g Angel hair pasta cook until al dente (until cook trough according package)
* 150 g beansprouts
* 175 cucumber, cut into 4 then sliced
* 20 lemon basil ( i skip this)
* 4 tbsp cooking oil
* 2 lemongrass, bruised
* 30 g onion, chopped
* 4 tbsp shredded coconut, dry roasting until brown, grind.
* 800 ml coconut milk
* 200 g fillet salmon, diced

Grind Ingredients (make paste):

* 8 shallot ( small brown onion)
* 4 garlic
* 7 dried chili, soak into warm water
* 2 cm turmeric
* 2 cm ginger
* 1 cm galangal
* 2 tbsp coriander seed (dry roasted)
* 1 tsp cumin (dry roasted)
* 2 tsp whole pepper (dry roasted)
* 1/2 tsp dry roasted shrimp paste (terasi/ belacan)

Methode:
1. Heat oil in the pan, sautee paste (grind ingredients), lemongrass and onion until fragrance.
2. Add browned grind coconut, mixed well.
3. Add coconut milk, simmer until boiling and thicken, add salmon fillet continue simmer until salmon is cooked.
4. Arrange cooked angel pasta, add salmon , beansprouts, lemon basil and cucumber. Serve warm.

IMG_0255

Tuesday, June 22, 2010

Kambing Panggang Berempah // Indonesian style Rich roast lamb

Kambing


Hi All...
It has been a long time again since i updated my kitchenfun.
Finally.... here I am with spicy Indonesian food that will make you droll :)
Unfortunately, I didn't take a good picture as it is getting dark and I haven't got any proper lighting set up for this photo ( I try to take some more pictures tomorrow with natural light *updated).
Winter is here now and I started to collect some more Indonesian slow cooking recipe again. Apart from managing my other blog ,my online shop, looking after my possum girl, sewing, cooking and never ending house work ").
I noticed that a new version of blogger has more feature than this old one, especially the photo uploader. I guess I just keep on upload my pictures via flickr, much better quality and size for this old blog.
Hoaaammm.... *pardon me* i'm getting so sleepy... I will write the recipe and fix the picture tomorrow so I won't make any mistakes.
As the recipe is written in Indonesian language from local magazine.
Good night everyone...

Updated* but sorry, haven't get a new pic but from my flickr.

Kambing Panggang Berempah // Indonesian style

Ingredients:

800 g goat/ lamb pieces on the bone
5 cm cinnamon stick
8 clove
1 whole nutmeg, bruised
5 kaffir lime leaves
2 lemongrass, bruised
3 Indonesian bay leaves (salam leaves)
2 cm ginger, bruised
3 cm galangal, bruised
1000ml coconut milk
2 tbsp tamarind water
50 g palm sugar / coconut sugar

Grind ingredients:
8 small brown onion
3 garlic glove
5 big red chillies
2 tsp salt
1 tbsp coriander seeds
1 tsp cumin
1 tsp white pepper

Method:

1. Sauteed grind ingredients along with cinnamon, nutmeg, clove, galangal, bay leave, ginger and lime leave, cook for 2 minutes or until aromatic.
2. Add lamb or goat pieces, cook until brown.
3. Add coconut milk, tamarind water and coconut sugar. Meanwhile heat the oven to 20 degrees C. Simmer until dry and meat is tender.
4. Transfer to ovenproof shallow pot, roast about 20 minutes.


Source:Kartini magazine 12-18 sept 2009, page 106


Wednesday, June 2, 2010

Yay... My Online shop has officially launched


Hello Friends, you probably wondering where am I??.
Well, I'm still here... making a new blog, making product and setting up my online shop.
But nothing to do with my cooking or kitchen.
Curious?...
Come and have a peek at http://elitcraft.com/

Have a nice day everyone!!

Sunday, January 10, 2010

Plum & Chocolate Clafoutis

plum & Chocolate Clafoutis 2

Summer in Melbourne is really strange, some days cold, some days very hot up to 45 degrees or more, this time of the year (January), even more strange. I still needed my heater early in the morning but needed an AC in the day time, when the sun getting strong...

Lucky me, in our new house we have a very good Ac and ceiling fan in some rooms, plus some fruits tree!! Yippie...

This plum i pick from our garden, don't know exactly when is the plums suppose to be harvest, hehe... when i pick these plums, they taste very sour, so i decided to make something nice than just eat them raw ( i was thinking to make a jam as well).

When i stumble with this recipe from my Donna Hay books, i definitely promised to my self to make it as soon i pick the plums (ending up the day after, hihi..). I thought to my self what the taste will be like, sour and very sweet chocolaty, Hmmm.. interesting and makes me drolling ;P

My daughter love it so much, more than her dad does :), and me??.. es i love it too!! so i would share this recipe for you all.

plum & Chocolate Clafoutis 3

Plum & Chocolate Clafoutis


Ingredients:

* 1/4 cup (50g) Plain flour
* 1/4 cup (30g) Cocoa powder, sifted
* 1/3 cup (75g) Caster sugar
* 1 teaspoon Vanilla extract ( i used vanilla powder)
* 3 eggs
* 1 cup (250ml) (single pouring) cream ~~ i used thicken cream
* 1 cup roughly chopped dark chocolate
* 20g Unsalted butter, melted
* 8 blood plums, halved & stoned

Method:

1. Preheat the oven 10 180°C. Place the flour, cocoa, and sugar in a bowl.
2. In a separate bowl, place eggs, vanilla and cream and stir to combine.
3. Add the egg mixture to the flour mixture and whisk to combine.
4. Stir in the chopped chocolate.
5. Brush a 4 cup (i litre)capacity baking dish with the melted butter.
5. Pour in the chocolate mixture, top with the plum halves and bake for 20-25 minutes or until puffed and cooked through.
Serves 8
Recipe by Donna Hay ~~ Simple essential Fruit~~


plum & Chocolate Clafoutis

Enjoy the rest of the weekend everyone...

And don't forget to visit my online book store here :)

Wednesday, January 6, 2010

Hot Cross Buns

hot cross buns 2

My baking mood is back, yeahh...
Love it..
But....
After i baked many things, photograph and upload on my computer then, who's gonna eat my cakes and sweets i made??, believed or not this hot cross buns i made last week and i still have the left over (getting bored having them for breakfast every morning :P ).

Yesterday i made banana Muffin, i already gave away some for my friend plus eat them as well with my hubby, today i made an attempt to bake macaroons (failed), and yummy Plum & Chocolate Clafoutis, there are lots more left over in my fridge!!. I actually gave some of the clafoutis to my next door neighbour, but still ending up with the left over.

By the way, there is a funny story on the day i finished baking my hot cross buns..
.
I was so exhausted that day after baking these buns, so i went to my room and lying down while Ellyn playing by herself in the family room. After a while, i heard a little foot running back and forward very quickly on the wooden floor (i thought she will go to my room as usual but not.

So i got curious and got up to find out, and there is a panic-ing little girl tried to swallow whole buns in her little mouth but couldn't, she said "Mommy, hug.. hug.." (she was looking so scared afraid that i will be so angry with her, and when her daddy coming to find out too (he was in the spare bedroom), "what happened?" he said , "she was stealing my buns from the kitchen bench" i said, she's even more panic and said "sorry, sorry, sorry daddy" and began to cry, so he just cuddling him cos he felt sorry to see her begging for an apology and cried so badly, " next time you ask mommy ok?, no stealing" he said " Ok daddy" she replied.

My poor girl.. she always feels like snacking and those buns surely was tempt her so much, i already gave her half buns before this happened cos her daddy doesn't want her to have too much, but she actually stole 1 1/2 ( the other half i threw away), all together she ate 2!

Can never forget that moment :)

hot cross buns

Ingredients

* 7g sachet (2 teaspoons) dry yeast
* 1/4 cup caster sugar
* 1/2 cup reduced-fat milk, warmed
* 2 1/2 cups plain flour
* 1 teaspoon mixed spice
* 50g butter, chilled, chopped
* 1 egg, lightly beaten
* 3/4 cup sultanas
* 1 teaspoon powdered gelatine
*
Flour paste
* 1/3 cup plain flour
* 1 tablespoon caster sugar

Method

1. Grease a 4cm-deep, 18cm x 28cm (base) slice pan. Place yeast, sugar and milk in a bowl. Stir until combined and yeast is dissolved. Cover and set aside in a warm place for 10 minutes or until foamy.
2. Sift flour and mixed spice into a bowl. Rub in butter until mixture resembles fine breadcrumbs. Make a well in the centre of flour mixture. Add yeast mixture, 1/4 cup warm water, egg and sultanas. Stir to combine. Cover and set aside in a warm place for 1 hour or until doubled in size.
3. Preheat oven to 200°C/180°C fan-forced. Turn dough onto a floured surface. Knead for 5 to 8 minutes or until smooth. Form into 12 balls. Place balls in prepared pan, 1cm apart. Cover and set aside in a warm place for 45 minutes or until balls double in size.
4. Make flour paste: Whisk flour, sugar and 1/4 cup cold water together in a jug. Spoon into a snap-lock bag. Snip off 1 corner from bag. Pipe crosses onto buns. Bake buns for 10 minutes. Reduce oven temperature to 180°C/160°C fan-forced. Bake for 15 minutes or until golden and cooked through.
5. Place 3 teaspoons hot water in a jug. Sprinkle gelatine over water. Stir with a fork until gelatine dissolves. Turn buns onto a wire rack. Brush tops with gelatine mixture. Allow to cool. Serve.

Taste magazine

By the way, i think i forgot to say HAPPY NEW YEAR 2010 EVERYONE, wish you all the best!!

Tuesday, January 5, 2010

Banana Muffin

banana Muffin

There are many recipe for banana muffin, and most of all using brown sugar (just like my banana bread), but this recipe called for caster sugar instead, i love the texture of this muffin, so moist and i can really taste the mashed banana.

I don't have mixed spices, so i tried to experiment making them, by mixing a pinch of ground nutmeg, cinnamon, and allspice, the taste was absolutely great!. Even if you only have nutmeg and cinnamon it's just as good.

There is no better feelings than having warm muffin freshly baked from your oven for breakfast, Hmmm.. the smell, the taste are just yummy... with a glass of milk for me because still, i can't drink coffee :(

I got this recipe from my favorite baking book called : The Essential Baking Cookbook"
You can find it in my STORE.

banana Muffin.2jpg

I will share this recipe for you all :) Enjoy...

Banana Muffin


* 2 1/2 cup self rising flour
* 3/4 cup caster sugar
* 1 cup milk
* 150 g butter, melted, cooled
* 2 eggs lightly beaten
* 1 tsp vanilla essence (i used powdered)
* 1 cup mashed ripe banana
* 1/2 tsp mixed spice

Method:

1. Preheat oven to 200 degrees C.
2. Mixed sugar, flour, mixed spice, stir trough.
3. Make well in the centre.
4. In a jug, mix together the milk, eggs and venilla essence.
5. Pour liquid into the well in the flour and add the mashed banana then cooled butter. mix well.
6. Bake for 20-25 minutes, or until golden brown.

Note: Easy for beginner :) no mixer required. So don't be afraid to try .